The idea of using paper in schools is a recent one. The cost of copiers and paper has come down significantly but there is so much volume that it ends up being a significant expense. Most teachers have a horror story about the day that the copier broke and this speaks to our dependence on delivering content through worksheets and paper. This comes at significant cost to our environment (bleached white paper is a toxic and harmful process to water sources) and to our schools.
While changing this mentality could take some time I would like to share some resources and tips that might help you next time you think about hitting that print button.
1) Printer Settings: This is the easiest one as it is already built into your computer. Each time you click print a window opens up called the Printer Dialog Box.
- In Windows you should see a drop down button under Pages per Sheet.
- On a Mac/Apple you must first select Layout and then you will see the Pages per Sheet option.
2) Printliminator (Print+Eliminator): While ads help pay for content and website logos and designs are pretty, they are deadly to a printer budget. Too often they are pictures in color and just simply eat up toner and space on your page. The Printliminator is a "bookmarklet" which means you create a bookmark in any browser you are in (best to have it on your main browser bar so it is quick and easy to access). Then when you are at the website you want to print, you click the Printliminator Bookmarklet.
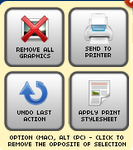
Rather than take you to a new site, a new little window will popup with some options:

- The primary way the Prinliminator works is you move your mouse over the area you would like to delete and when it turns red, you click and it will disapear. This isn't permanent so if you refresh the page or press UNDO on the Printliminator it will come back.
- Remove All Graphics - Keep in mind, this will do the job but also remove any graphics you need to print. It should only be used if it is just the text you want.
- Undo Last Action - Simply takes you back to the original website one click at a time.
- Send to the Printer - Brings up the Print Dialog box mentioned above so you could still print multiple pages per sheet.
- Apply Print Stylesheet - Printliminator will try and do the hard work for you. Keep in mind like Removing All Graphics it may take out more than you want so be mindful of how often you use it.
3) Sheet Protectors: Sometimes the low tech solutions are the best. If you have a handout for a game/activity/lab that you would like your students to be able to write on but then be able to erase and use again then you will want to use this. Sheet protectors are those plastic envelopes that you can slide an 8.5"x11" piece of paper into. You can find them at office supply, department stores, and on Amazon.
Simply place the paper inside the sheet protector, use fine tip dry erase markers and you will be able to use the paper over and over again. I would suppose you could do this with laminating the paper as well, but the sheet protectors are more versatile.
May we all be more mindful of the paper we use and what we use it for. Until next time...


