The FIRST Robotics Competition will begin this Saturday and I can't wait to tell you all about this years competition challenge.
 Since I wasn't posting over the holidays I was not able to give you a present. So although it is belated, I wanted to share with you one of my favorite pieces of free and open source software, Geogebra (Geometry + Algebra). I remember seeing this software for the first time years ago and seeing the potential for Educational Technology. In fact, I will be speaking at the 2011 CUE conference in Palm Springs this year entitled "Geogebra for Interactive Mathematics".
Should you start using Geogebra? Well tell me if you have experienced this:
- Difficulty graphing on the Whiteboard because of time or quality of drawing skills.
- Confusion with your students about the relationships of variables and their coefficients (e.g. what happens when "m" or "b" changes in y=mx+b).
- Students forgetting a long proof or steps to solve an equation.
- And all of the other frustrations that come with the limits of reality to explain abstract concepts.
If you nodded your head to any of the above, then you need Geogebra. Don't worry though, it is free and easy to get started.
Getting Started With Geogebra
Step 1: Go to www.geogebra.org and click download.
- UPDATE: Since this post was written, there is now a Geogebra for Elementary students. It is the same functionality but with bigger fonts and an easier user interface.
Step 2: You have 3 options for using Geogebra to accommodate as many possible situations as possible.
- Webstart - This is the option to choose if you want to be able to use Geogebra offline. It requires you to install the software and so make sure you talk with your school's IT department about getting this setup. Good option if you can get it just in case the web is down.
- Applet Start - Allows you to use Geogebra fully in your web browser as long as you are connected to the web.
- Offline Install - Use this option to download a Geogebra installer and share with a student if they do not have Internet access.
Most of the time you will use the Applet Start. This requires up to date Java which most classrooms have if the IT department works on them at least once a year.
Step 3: Open Geogebra. It will look the same no matter how you open it and on which computer, which is a beautiful thing when you are working with students.
Let's look at the construction tools that you will use most often. These tools are used together with others to make objects and manipulate them.

These buttons also store additional tools. I will describe each button and the additional tools in that menu. To see the additional tools, just click on the little arrow in the lower right of each button.
From left to right, you will find:
- Move, Rotate, Record to Spreadsheet
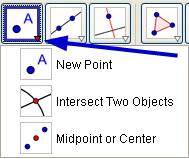
- New Point, Intersect two objects, Midpoint or Center
- Lines, Segments, Vectors, and Ray Tools
- Perpendicular, Parallel, Tangent, Best Fit
- Draw Polygon, or Regular Polygon
- Circle Tools
- Ellipse, Hyperbola, Parabola
- Angle, Distance, Area, and Slope
- Reflections and Translations
- Sliders, Text, Images
- Move, Zoom, Show/Hide
A lot of features, and it could seem overwhelming at first. But like any powerful software like Audacity or Inkscape, it is important to play around and get the basics and over time you will grow deeper in your understanding. Most important is that you believe in yourself and your ability to do this! I promise.
 Step 4:Lets play around a bit to get the hang of the interface. Geogebra opens up with a nice graph all ready for you so lets add some dots. Click on the New Point Button and then click anywhere on the graph.
You'll notice that a new point has been created and labeled "A". This is also reflected on the left under "Free Objects". This means that you can change or move the point if you want.
Now create another point anywhere you want. A new point labeled "B" is created and the coordinates for both A and B are shown on the left-hand side.
 Step 5: Lets turn those points into a line. Click the appropriately named "Line through Two Points" button on the right of the new point button. Then click on Point A and then Point B on the graph. A new line is formed labeled "a" (lowercase to differentiate it from points and you can change all of the names to whatever you would like later).
If you did the previous steps correctly, you should also see the equation for your line under dependent objects (because it depends on Point A and B). It defaults to standard form (Ax + By = C) but you can change that to slope intercept form by right clicking on the line and choosing y=mx+b. You can see this in the picture below but remember that our points and lines are going to differ so my numbers are not the same as yours.

You are probably ecstatic over how much clearer and precise your math demonstrations can be. Let me show you a couple more things today and next time we will go a bit more advanced.
 Step 6: Lets make a perpendicular line. Click the next button to the right called "Perpendicular Line". It asks you to click on a point and a line, so click on either Point A, Point B, or create a Point C with the add a new point button from step 4. Then click on Line A.
Your perpendicular line has been created. If you would like to "undo" a step, click Ctrl+Z or choose it from the Edit Menu, but followers of this blog know the power of using Keyboard Shortcuts.
You may need to shift or zoom out, and you can easily do so by clicking on the "Move Graphics View" button. Just make sure you click the "Move" button (the furthest left) in order to click on objects again.

Step 7: As amazing as Geogebra is, you might ask yourself why my CUE Conference demonstration refers to using Geogebra to make "Interactive Mathematics". Well, usually once you have printed out a worksheet or drawn something on the board, it is done and it is difficult if not impossible to play around with it. There are expensive SMART boards that can create Interactive Math but you can do it for free with a computer and Geogebra.
Making sure the "Move" button on the far left is selected, select, hold, and drag Point A. You should see the entire line and it's perpendicular line shift around as well as the equations and points on the left. Check out the video below to see Geogebra in action.
Pretty amazing huh? Math does not have to be dead, now students can play with it, and play they will. Let them loose on Geogebra and they will create amazing art, drawings, and constructions in no time.
In the next couple of posts, I will show you even more amazing things in Geogebra. We should be able to cover:
- Sliders and Animation
- Embedding and Sharing Geogebra files with your students and the World
- And some great resources from other Educators that you can immediately start using in your classroom.
If I could enlist in your help, I want to ensure that the CUE conference and these posts are helpful and relevant to you. If you have a suggestion for a Geogebra topic (or any topic in general) please leave it in the comments, send me an Email, comment on Facebook, or tweet me @BrokenAirplane. Thanks!
Subscribe to BrokenAirplane!
Subscribe to BrokenAirplane!